
We are getting ready to make some natural coil baskets in the July 2024 online conference for all Waldorf subject teachers. I am so excited to make these baskets! There are many fibers to choose from and lots of colors you can find online. However, I wanted to keep my materials locally sourced as I gathered them. I found the basics of what I needed at my local hardware store, and I wanted to add a splash of color. So I decided to experiment with some natural kitchen dyes. I am so thrilled with the results I thought I'd share about my process.
It was easy, inexpensive, totally non-toxic, and really fun!
Read on to learn more and watch the video tutorial linked below on our YouTube channel!
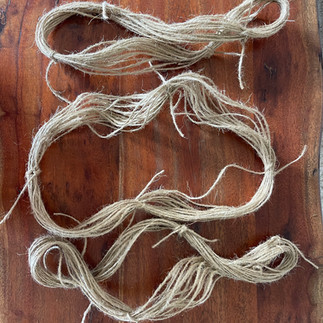
Coil baskets can be made in many sizes and with many different materials. Essentially, all you need is a filler rope and a natural wrapping material. The filler rope won't show but is easier to work with if it's a natural fiber. During the conference, we will be teaching you options for making 2 different sizes. You can use a 1/4" or a 1/2" filler rope. This could be jute, hemp, cotton clothesline, cotton piping, macrame cord, all sorts of things. The key is to choose a wrapping fiber that is thinner than your filler rope. For wrapping fibers we recommend using raffia, raffia paper, 2mm jute, or similar. Even T-shirt yarn or worsted weight yarn will work for wrapping on the thicker 1/2" filler rope.

I wanted to make both sizes of baskets. At my local hardware store, I found a 1/4" cotton clothesline for filler and a good deal on 2mm jute that I will use for wrapping. And I found a beautiful skein of natural raffia and a 1/2" cotton piping at my local craft supply store.

Next, I gathered my dye ingredients. When I first started learning about natural dyes more than 20 years ago. I was so meticulous. I felt like I had to follow each instruction to the letter and have every tiny detail in place. And while there are still some projects and some materials that I will measure to the exact milligram, (cochineal and indigo to name a few) what I have learned through my experience is that you really can’t go wrong with natural dyes. Any result will be beautiful because natural dyes are living breathing colors from the earth! So for this project, I wanted to just play and immerse myself in the freedom of color. I chose not to measure, not to worry, to have fun, and to be fearless. I simply gathered as many onion skins as I could, as much turmeric as I had on hand, and threw in as many teabags as I was inspired to use.
I love dyeing with red and yellow onion skins. They give a wide range of colors and they can be gathered (almost) for free at the grocery store. I've noticed most of the fancier markets have super clean onion bins with no scrap skins. But I hit the jackpot at the Walmart onion bin and was able to fill a huge bag of skins and I only bought one onion! I also had some black tea, wild raspberry hibiscus tea, and fresh turmeric at home so I decided to use these too.


Before getting started I carefully wound the jute into mini skeins and tied them off with figure 8 knots, just like I would if I was dyeing yarn. I also tied my raffia into bundles to keep it from getting too tangled in the dye pots. I pre-wetted the fibers and let them soak in some clean water for about an hour before I began. Pre-wetting the fibers ensures they will take up the dye evenly.


Onion skins are naturally high in tannins so they do not require any kind of mordant. But I knew the fibers dyed with tea would have a much deeper color with a soy milk mordant so I decided to toss it all into a soy milk bath.

I used 1 part soy milk to 2 parts water - that worked out to 1 gallon of soy and 3 gallons of water. I let the fibers soak in the room temperature mordant bath overnight.
Next, I was ready to bring the colors to life! I prepped my dye ingredients:
Turmeric - I peeled and diced fresh turmeric. But you can also use dry turmeric right from the spice jar.
Onion skins - I made sure to keep the yellow and red onion skins separate as they each give very different colors. I left the skins whole and tried my best to pick off all the little supermarket stickers. But I didn't worry too much about it. A few stickers won't affect the quality of your dye.
I put all 3 of these into separate stock pots and filled them with water. I brought it to a boil and then turned it down to simmer for about an hour.
I did not boil the teas. I just put them in a pot with hot water just like I would if I was making my morning cup of tea. I used 25 bags of black tea in one pot and 20 bags of hibiscus raspberry tea in another pot. I let them steep for an hour.
After the dyes had steeped and simmered I brought all the pots outside. I strained off the onion skins and turmeric but I left the tea bags in the dye pot.


I let the fibers soak in the dye pots overnight and most of the next day. So about 18 hours in all. And when I pulled them out I was so happy with the results!
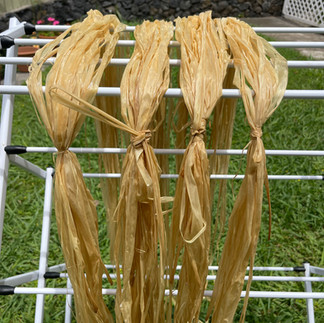
Here they are from left to right:
Yellow onion skins, turmeric, red onion skins, black tea, hibiscus raspberry tea.

I could have stopped right there and been perfectly happy with my colors. But I wanted to take it a step further. I decided to use my 3 favorite after baths for onion skins. After baths are like pure magic with onion skins! They instantly shift the color to give an even wider range.

Iron Liquor - This is a simple solution made from rusty nails and vinegar. For a complete tutorial on how to make rust and iron liquor check out our video tutorial. How to Make Rust
I used 2 TBL of iron liquor per 1 gallon of water
2. Baking Soda - Alkaline Shift - I used 1 cup of baking soda with 1 gallon of water
3. White Vinegar - Acid Shift - I used 1 part vinegar to 4 parts water.
I only used the after baths on the onion skin dyed fibers. They really gave my colors a pop! The iron liquor shifted the warm orange color to a deep mossy green, almost black! And the baking soda and vinegar brought out some gorgeous sunshine yellows and warm auburn tones.
All in all this dye project was a huge success! I turned one color of jute into 5 colors and one color of raffia into 11 colors! I can't wait to get rolling on my coil baskets! I hope you enjoyed this color journey and will have fun experimenting with your own dyes on raffia and jute!
To learn how to create your own raffia and jute coil baskets join us for our online international conference this July!


Comments